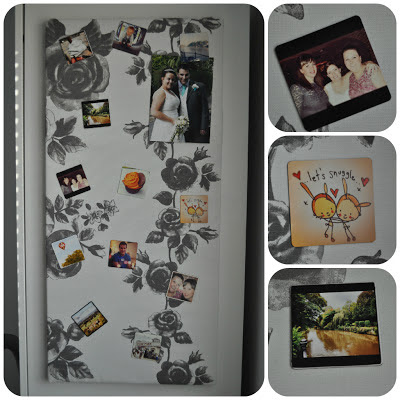
I had seen when doing one of my frequent wanders around Ikea for storage inspiration that they had covered one of their 'Spontan' magnet boards in fabric before hanging it up and I knew that this is what I wanted to do in the spare room on the side of my wardrobe.
So the project began, and I had a couple of important questions to answer; how was I going to hang it, and how was I going to mount the fabric?
Because I eventually wanted to hang the board on the side of my wardrobe I needed to find a way to hang it that didn't involve large nails or tacks. I have used Command Strips a couple of times for a few different things and saw that the large picture hanging strips would probably be the best option. They are so clever, and if used correctly enable you to display photos and even lighter mirrors without putting any holes in your wall, and can be taken off without marking!
I found the Ikea Hackers website in a google search and I soon worked out that the best way to get the fabric to adhere to the board would be using a glue gun, so a quick trip to hobby craft and I was set to get this underway.
Equipment
Scissors
Glue Gun
Glue Sticks
1 x Spontan magent board
1 metre of fabric from Ikea (can't find it on the website anymore)
1 pack of Command large picture hanging strips (not shown)
Instructions
- Cut the fabric so that it will cover the magnet board and of course wrap over the sides and the back. I cut the fabric approximately 2 inches taller and wider on each side of the board to allow for this. (picture below).
- Following the instructions given with the Command Strips I placed each of them on the back edge of the board
- Iron the fabric to get rid of any creases.
- I folded the fabric over, and where it covered the strips I cut around it so that the Command Strips were exposed. It is important to do this as neatly as possible as you do not want frayed fabric to show on the side of your board when it is hanging.
- Once the glue gun was hot enough, I placed the glue directly on the Board and patted the fabric gently (as the glue is hot) down onto it. You have to do this quite quickly as the glue cools rapidly, so best to do it little bit by little bit.
- Remember to keep your fabric as tense as possible so that you don't get any wrinkles
- The hardest bit was definitely the corners but I folded them like I was wrapping a present to get the neatest lines, and glued each section down.
- Once I was sure the glue was set I took the board up to where I was going to mount it, and following the instructions on the Command Strip packet stuck it to the side of my wardrobe.
This took me no longer than an hour to do, and around an hour for the adhesive on the Command Strips to set before it could be hung up. So a very easy, and quick way of personalising something that could otherwise be so boring. I love the way that the roses look like they are climbing up the board!
So all I needed now were some magnets so that I could display a few treasured items. I saw these Pic Pack Instagram magnets on Lily's blog and knew that they would look great on my board as well as giving it even more of a personalised touch.
The programme on Pic Pack gains access to your instagram account (with your permission of course) and you select 12 of you favourite photos to upload onto the website. You proof them, then and there and for the small sum of 18 Euros (around £14) these are delivered to you. They do take a while to be delivered as they come from Europe but they were definitely worth it and I've had some great comments on them! I think they would make a great gift for any instagram addict, but the wait for delivery means you will need to get ordering quickly if you want them for Christmas.
I hope you like my Ikea Hack. Have you managed to personalise anything recently?


Just followed you and came across this! What a cute idea. This would be perfect for my kitchen. You can check my blog out at http://justinawho.blogspot.com/
ReplyDelete